A Trio of Beautiful Recipes for a Late Summer Picnic

There's nothing like a late summer picnic to squeeze the last bit of that kicked back feel out of the season. 

But say, "Nope!" to soggy sandwiches and cardboard-ish packaged cookies. Making the best foods to bring outside isn't just better tasting - it's a huge part of the experience. 

WhitneyNicholsPhotography-5900.jpg


For the lakeside picnic we hosted recently, I focused on using fresh, seasonal foods. Tomatoes from my garden and beets and blackberries from the farmer's market were center stage in the recipes I used, and I thought I'd share them with you.

You know, just in case you want to get yourself and your loved ones outside for a last hurrah of the summer!

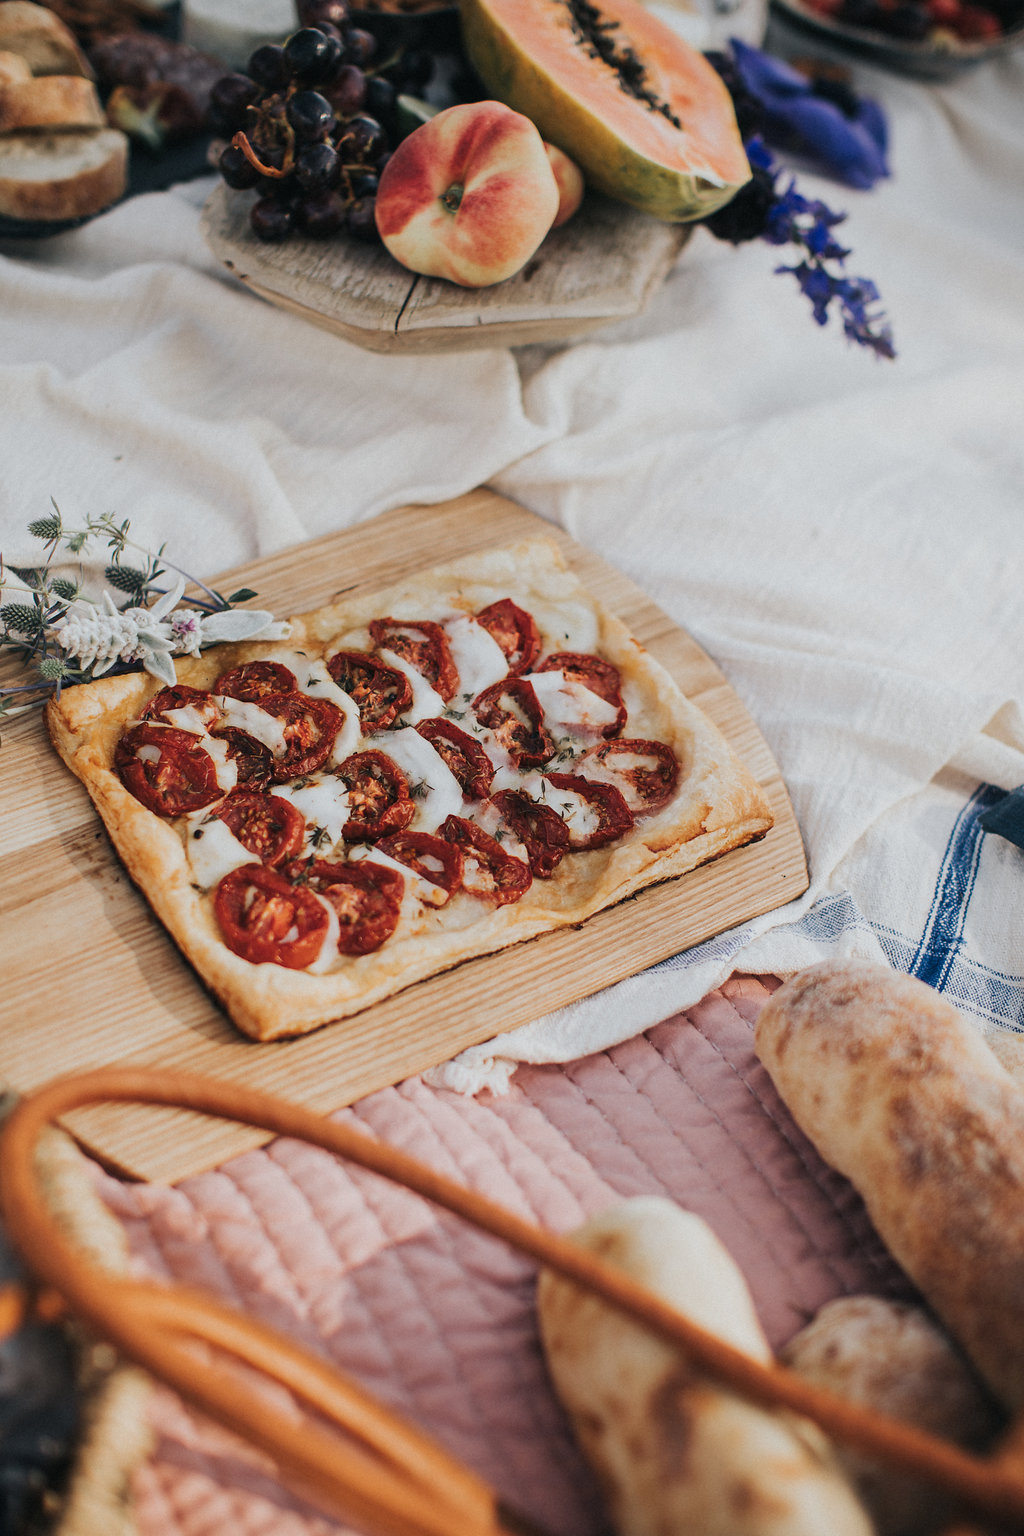
I'm calling this insanely delicious little number a Buffalo Cheese Tart, even though Simply Delicious Food, where I got the recipe calls it a Caprese Tart. To-may-to, to-mah-to - either way, it's super simple to make and it looks and tastes divine! 

WhitneyNicholsPhotography-6023.jpg

I put some of the incredible cheese Vermont Creamery sent me to great use with this recipe. We all know really good cheese is so much better for cheese plates, but it's amazing what a huge difference it makes for cooking too.

WhitneyNicholsPhotography-5591.jpg


And by the way, the ah.maz.ing rose´ Buttonwood Grove Winery sent us was the best wine ever with this tart!

Yield: 6

Buffalo Cheese Tart

prep time: 20 minscook time: 40 minstotal time: 60 mins

ingredients:

For the roasted tomatoes
  • 10 tomatoes, cut into 1cm thick slices
  • 2 T olive oil
  • sea salt flakes
  • black pepper
For the tart
  • 1 roll of frozen, ready made puff pastry - defrosted
  • 7 oz buffalo mozzarella cheese, cut into 1/2 cm slices
  • 1 egg, beaten
  • Fresh basil leaves

instructions:

  1. Pre-heat the oven to 350°F.
  2. Place the sliced tomatoes on a non-stick baking tray and drizzle with the olive oil. Season with salt and pepper and place in the oven.
  3. Allow to roast for 20 minutes or until the tomatoes are soft and are caramelising around the edges.
  4. Remove from the oven and allow to cool slightly. Turn the oven down to 180°c.
  5. To make the tart, roll the pastry out a little thinner and place on a baking paper-lined baking sheet. Score around the edges to make a border, ensuring you don't cut through the pastry.
  6. Place the tomatoes and mozzarella on the pastry, alternating between the two.
  7. Brush the edges of the pastry with the beaten egg.
  8. Drizzle a little olive oil over the tomatoes and mozzarella and season with salt & pepper.
  9. Place in the oven and allow to bake for 15-20 minutes until the pastry is crisp and golden.
  10. Remove from the oven and top with the fresh basil leaves. Serve immediately.
Created using The Recipes Generator

It may look like some kind of organic spa treatment, but this Roasted Beet Hummus from our fave Half Baked Harvest is so, so yummy. It's the perfect way to get a dose of that brilliantly colored super food. Beets are a super food, aren't they? If not, they should be!

WhitneyNicholsPhotography-5910.jpg
WhitneyNicholsPhotography-6009.jpg
Yield: 2 cups

Roasted Beet Hummus

prep time: 15 minscook time: 45 minstotal time: 60 mins

ingredients:

2 whole small or 1 large red or yellow beets
4 cloves whole of garlic - omit if not preferred
2 cups cooked chickpeas drained + rinsed*
1/4 cup tahini sesame seed paste
2 tablespoons almond butter
1 tablespoon white miso paste
juice of 1/2 a lemon
2 tablespoons balsamic vinegar optional
1/3 cup olive oil + more for drizzling
salt and pepper to taste
toasted sesame seeds + toasted pine nuts + fresh dill for topping

BEET GREEN PESTO
1 1/2 cups raw beet greens finely chopped
3 tablespoons toasted pine nuts finely chopped
3 tablespoons parmesan or nutritional yeast
2 tablespoons olive oil
salt + pepper to taste
pinch of crushed red pepper flakes

instructions:

Preheat the oven to 425 degrees F. 
Wrap the beets and garlic cloves (if using) in a piece of tin foil. Place the beets on a baking sheet and roast for 45 minutes to 1 hour or until soft. Allow the beets to cool and then peel/rub the skin away. Remove the skins of the garlic cloves.
To the bowl of a food processor, add the chickpeas, tahini, almond butter, miso paste, crushed red pepper flakes and lemon juice. Puree the mixture until smooth, scraping down the sides if necessary. Add 1/3 cup water and puree until smooth. Add the roasted beets and garlic. If using, stream in the balsamic vinegar. With the machine running stream in the olive oil until smooth and creamy. I like to let my machine run a good 5 minutes (scraping down the sides once or twice) to ensure a really smooth and creamy hummus. If the hummus is too thick for your liking, thin with water or extra olive oil, adding about 1 tablespoon at a time until your desired consistency is reached. Taste and season as desired with salt + pepper. To serve, top the hummus with pesto (recipe below). Sprinkle with toasted seeds and dill. Drizzle with olive oil. The hummus will keep for 1 week, covered in the fridge.

BEET GREEN PESTO
Combine all the ingredients in a bowl and stir to combine. Taste and adjust salt + pepper to your liking.
Created using The Recipes Generator

I turned to Half Baked Harvest once again for this Blackberry Lavender Naked Cake which I paired with HBH's Chamomile Cream Frosting. It just feels so right to have cake for dessert on a picnic. 

WhitneyNicholsPhotography-6008.jpg
WhitneyNicholsPhotography-6007.jpg
Yield: 24

Blackberry Lavender Naked Cake with Chamomile Cream Frosting

prep time: 30 minscook time: 30 minstotal time: 60 mins

ingredients:

CAKE
1 cup canola oil
1/2 cup plain greek yogurt
3 large eggs
2 cups granulated sugar
1 tablespoon vanilla extract
1 1/2 cups buttermilk
3 3/4 cups all purpose flour
1 teaspoon baking soda
1 teaspoon baking powder
1 teaspoon kosher salt

BLACKBERRY LAVENDER JAM
6 cups fresh or frozen blackberries
1/2 cup honey
1 tablespoon lemon juice
1-2 teaspoons dried lavender

CHAMOMILE CREAM FROSTING
2 cups heavy cream
6 chamomile tea bags
8 ounces cream cheese
1/4 cup powdered sugar

instructions:

1. Preheat oven to 350 degrees F. Grease 2 (8-inch) round cake pans. Line with parchment paper, then butter/spray with cooking spray.

2. In the bowl of a stand mixer (or use a hand-held mixer) beat together the canola oil, yogurt, eggs, sugar, vanilla, and buttermilk. Add the flour, baking soda, baking powder, and salt and mix until just combined. 

3. Pour the batter among the cake pans and bake 30-35 minutes, until the tops are just set and no longer wiggly in the center. Remove and let cool five minutes, then run a knife around the edges of the pan and turn the cakes out onto a cooling rack. Cover and let the cakes cool completely before assembling.

4. To make the jam. Add the blackberries, honey, lemon juice, and lavender to a medium size pot set over high heat. Bring the mixture to a boil, once boiling use a potato masher or fork to break down and mash the berries. Continue to cook for 5-8 minutes or until the jam has reduced and thickened by 1/3. Remove from the heat and let cool. Should thicken as it cools. 

5. To make the chamomile cream. Add 1 cup cream to a small saucepan and bring to a simmer, but do not boil, simmer 1 minute and remove from the heat. Add the tea bags, cover and steep for 5-10 minutes. Remove the tea bag and place the cream in the fridge to chill completely. Next, beat the cream cheese in a stand mixer until fluffy, add the chilled chamomile cream and remaining 1 cup cream and whip until stiff peaks form. Stir in the powdered sugar. Keep stored in the fridge.

6. To assemble. Using a large serrated knife, carefully cut each cake in half horizontally. Place one cake layer on a serving plate. Spread 1/4 of the frosting over the cake and layer with about 1/4 cup of jam. Repeat with the remaining 3 cake layers. Be careful not to over fill your layers or the cake will be hard to slice. Lightly frost the outside of the cake. Chill 30 minutes. Serve or store in the fridge for up to 1 day. 


Created using The Recipes Generator


I hope you'll make the most of these late summer days that seem to be flying by with a delicious picnic meal like ours. 

Enjoy!

Charity


Previous
Previous

Getting Your Mudroom Back-to-School Ready in Style

Next
Next

Bring the Indoors Outside with a Picnic at the Lake